Table of content
- Is Your G7 Really Giving Inaccurate Readings?
- How Do I Know If the CGM Readings Are Correct?
- When Should You Calibrate Your Dexcom G7?
- How to Calibrate the Dexcom G7 with Instructions
- Why Dexcom G7 is Not Accurate: How to Fix It
- How Often to Calibrate Dexcom G7
- G7 Sensor Maintenance: Frequency and Installation Guide
- Conclusion:
- FAQs
Continuous Glucose monitoring systems (CGM systems) are calibrated with blood glucose meters (BGMs). This calibration involves entering the blood sugar readings from a BGM into your CGM. As a result, your CGM adjusts its readings, which are either showing higher or lower than the accurate reading. While many individuals are asking ‘How to Calibrate Dexcom G7?’, as per the company, calibrating a Dexcom G7 is Not required. However, in case of incorrect blood sugar readings, there is an option to calibrate your G7 sensor.
Is Your G7 Really Giving Inaccurate Readings?
No, just a different reading from a BGM does not mean you CGM isn’t correct.
First and foremost, you need to understand the underlying difference between a CGM and a BGM glucose monitoring.
BGM: It measures your blood sugar directly from your blood, and thus requires finger pricking.
CGM: With the help of a micro-pin, it measures you blood sugar from your interstitial fluid which is right under your visible skin.
Interstitial fluid: This comes from blood capillaries and when new fluid comes in, the old one is drained through the lymph vessels. Varying among individuals, it can take between seconds to minutes for the new fluid to be formed.
This is why your CGM and BGM readings may show some unusual differences at times. Especially, during the times when your glucose is fluctuating swiftly, e.g., right after having a meal. At such times when your glucose is fluctuating rapidly, wait for 5 – 10 minutes for your CGM to catch your current glucose readings.
How Do I Know If the CGM Readings Are Correct?
When your glucose is not changing rapidly, there should be little difference between the CGM and BGM readings. As shared by PubMed, according to ISO 15197:2013 and the FDA, ‘At least 95 % of measured glucose values should be within either ±15 mg/dl of the averaged comparison values at glucose concentrations <100 mg/dl.’
This means if your BGM is showing a value of 80 mg/dl, your CGM value can be;
80 + 15 = 95 mg/dl
OR
80 – 15 = 65 mg/dl
The ISO and FDA has given a value of ±15 mg/dl, however, ‘What is the 20 rule on the Dexcom G7?’, the Dexcom has indicated a difference of ±20 mg/dl to be correct.
This means in case of a Dexcom CGM sensor, considering your blood sugar is not changing swiftly, if you notice multiple readings which are more than 20 mg/dl off your BGM readings, then you should consider calibrating your sensor. Thus, the answer to ‘Can you reset a Dexcom G7 sensor?’, is a ‘yes’, however, only when you notice certain facts.
When Should You Calibrate Your Dexcom G7?
- Only if needed: Follow the “20/20 Rule” – calibrate if the CGM and your BG meter differ by more than 20 mg/dL or 20% (whichever is larger).
- Best times: After the initial 24 hours (warm-up can be wonky), when the trend arrow is stable (not rising or falling fast), and at least 15 minutes after your last calibration.
- When to avoid: During rapid BG changes, post-meal spikes, exercise, illness, or if you’re dehydrated. Also, skip it in the first 12-24 hours.
In some countries (e.g., parts of Europe) or with variants like Dexcom One, you might only “log” BG values as events without them adjusting readings. Check your app settings or local Dexcom resources to confirm.
How to Calibrate the Dexcom G7 with Instructions
Calibrating Dexcom G7 ensures accurate glucose readings and helps prevent sensor errors. Follow this step-by-step guide to properly calibrate your Dexcom G7 for reliable monitoring.
First of all, use a reliable BG meter e.g Contour Next Gen or Accu Chek Guide, with fresh strips that are available on a best retailer like CGM Monitors and followthese guidelines to work promptly.
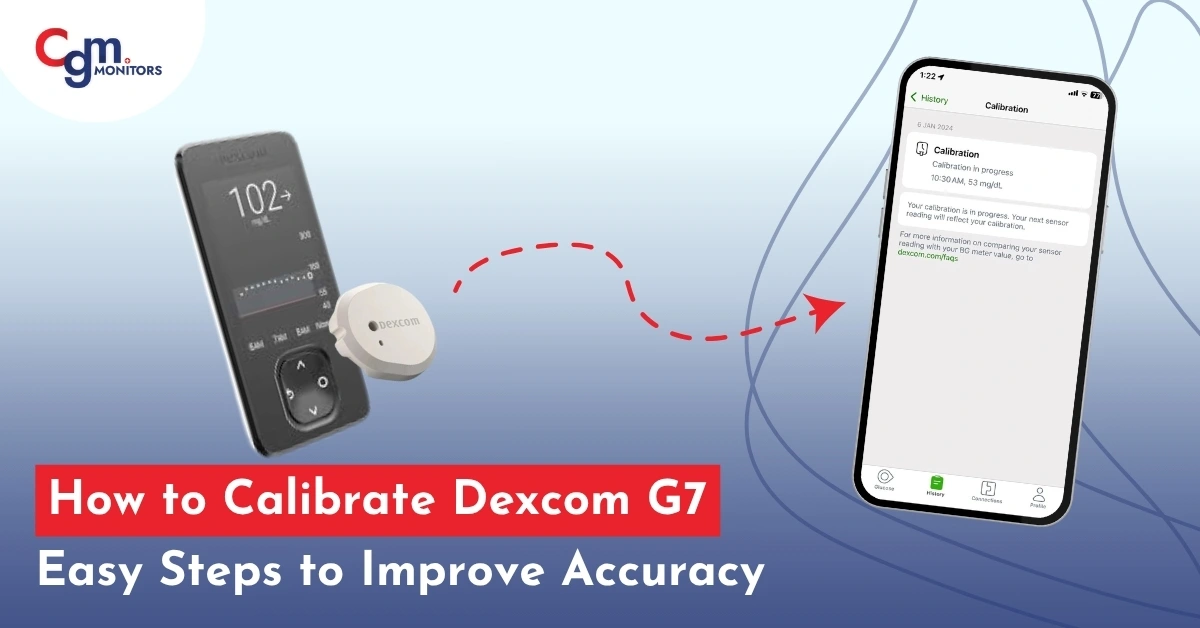
On the Dexcom G7 App (iPhone and Android)
- Open up the Dexcom G7 app.
- Click ‘+’ on the top right corner.
- Choose ‘Blood Glucose’ from the pop-up menu.
- Choose ‘Use as calibration’.
- Enter your BGM value and click ‘Save’.
- It will give you an explanation. Click ‘I understand’.
- Confirm if you have entered the correct number.
On the Receiver (if using One)
- From the home screen, tap the menu.
- Select “Calibrate” or “Events” > “Blood Glucose.”
- Enter the value and confirm it as a calibration.
Tips:
Calibrate 1-3 times if needed, but not more—over-calibrating can worsen accuracy.
It may take 15-30 minutes for the adjustment to show.
If the app says “Calibration in Progress” for hours, restart the sensor or app.
If Calibration Isn’t an Option: In some setups (e.g., Dexcom One or certain countries), you can only log BG as an event, which doesn’t adjust readings but tracks them for your history.
Your CGM sensor shall not abruptly change its measurements, but will slowly adjust itself.
Why Dexcom G7 is Not Accurate: How to Fix It
Dexcom G7 is not accurate, or somehow sensor low readings are the most common complaints among the diabetes community and the good news? Most issues are fixable without ditching the sensor.
Common Reasons for Inaccurate Readings
- Compression Low: Sleeping or pressing on the sensor can cause false lows or compression lows”. To tackle this situation, you should rotate sites and avoid tight clothing.
- Warm-Up Period: The first day is often less precise. Patience is key—accuracy improves by Day 2.
- Interferences: Meds like acetaminophen (Tylenol), vitamin C, or even MRI scans can skew readings.
- Site Selection Issues: Optimal placement is the back of the upper arm; avoid areas with scars, moles, or loose skin. it is suggested to alternate between arms to maintain consistent performance.
- Sensor Wear Over Time: As the standard version of Dexcom G7 approaches the end of its 10-day lifespan and the new G7 has 15.5 days of lifespan, readings may gradually become less precise. It is recommended to replace the sensor earlier if discrepancies persist.
- Physiological Lag: Continuous glucose monitors measure glucose in interstitial fluid, which naturally lags behind blood glucose levels by about 5-10 minutes. This is a normal characteristic of the technology and not indicative of a malfunction.
How Often to Calibrate Dexcom G7
The Dexcom G7 continuous glucose monitor does not have to be calibrated. It has a factory-calibrated design which is designed to work without frequent user calibrations. Calibration with the help of a blood glucose meter may be optional in case the readings appear to be inconsistent (i.e. more than 20 points difference). Most users tune in only when necessary, e.g. 1-3 times in the lifetime of the sensor, not the first 12 hours after insertion. It is advisable to wait 15- 30 minutes between calibrations and always consult your doctor to get personal advice.
G7 Sensor Maintenance: Frequency and Installation Guide
How Often to Change Your Dexcom G7 Sensor (10 and 15 days)
- Standard G7 Sensor: Needs to be changed every 10 days. The app notifies you 6 hours before it expires. You get a 12-hour buffer, but don’t push it.
- New Dexcom G7 Sensor: You have to replace it after 15 days, and pre installed app will give you a reminder 6 hours before it expires.
Easy Installation Guide
- Clean and dry your skin (upper arm preferred).
- Peel the adhesive, insert with the applicator (one-button press).
- Pair via app—no sensor code needed.
- Wait 12 hours for warm-up (no readings yet).
If you are facing issues related to the Dexcom G7 and want to troubleshoot it on the spot, this guide will help you in this regard because it has been written based on the experiences faced by the diabetic patient.
Conclusion:
The answer to a common question, ‘Is Dexcom accurate without calibration?’, as per Dexcom, is a ‘yes’. However, when your Dexcom G7 sensor is giving readings which are too far off from your BGM readings in a state when your glucose levels are not changing rapidly, and you notice numerous such readings, consider calibrating your CGM sensor. Additionally, if you are considering switching your CGM sensor, you may want to have a look at Freestyle Libre 2 Plus Sensors, which are not only accurate but also AID compatible as well.
FAQs
What is calibration and why is it important for the Dexcom G7?
Calibration for the Dexcom G7 involves entering a blood glucose reading from a fingerstick meter to help align the continuous glucose monitor’s data more closely with actual levels. For diabetic patients, this process is crucial when sensor readings seem inconsistent, as it enhances the reliability of glucose trends and alerts, enabling better management of blood sugar to prevent highs or lows.
How do I calibrate my Dexcom G7 sensor for accurate readings?
To calibrate your Dexcom G7, start by washing your hands thoroughly and taking a fingerstick blood glucose measurement with your meter. Then, open the Dexcom app on your smart device, tap the plus icon in the Glucose or History tab, select “Use as Calibration,” and input the meter value within five minutes for best results. This simple step helps diabetic patients ensure their CGM readings are more aligned with traditional checks, promoting confidence in daily glucose monitoring.
How to calibrate Dexcom G7 on iPhone?
- Launch the Dexcom G7 app.
- Click ‘+‘ in the upper-right corner to add.
- Select “Blood Glucose” from the pop-up menu.
- Select “Use as Calibration.“
- Enter the BGM value you wish to save and click ‘Save‘.
- Click “I understand” for more details.
- Verify if the correct number has been entered.
How often can I calibrate my Dexcom G7 without issues?
Diabetic patients can calibrate the Dexcom G7 optionally when readings appear off, but it’s best to limit it to once if needed rather than frequently to avoid potential inaccuracies. The device is factory-calibrated for reliability without regular inputs, so calibrating more than necessary, such as multiple times a day, might lead to unstable data.
What are the potential risks of over-calibrating the Dexcom G7?
Over-calibrating the Dexcom G7 can result in exaggerated swings in displayed glucose levels, potentially leading to misleading information that affects diabetes decisions. For patients, this might cause unnecessary stress or incorrect insulin adjustments, increasing the chance of hypo- or hyperglycemia. Sticking to minimal, necessary calibrations preserves the device’s natural accuracy and supports stable monitoring.
How can I make my Dexcom G7 more accurate?
If your blood glucose is not fluctuating rapidly, and your Dexcom G7 sensor is giving readings more than ±20 mg/dl off your BGM readings, then calibration with your BGM value should increase its accuracy.
Why are my Dexcom G7 readings not accurate?
Inaccurate readings can be caused by improper sensor placement, dehydration, rapid glucose changes, or expired sensors. Ensuring the sensor is on approved body areas and following insertion instructions can improve accuracy.
How long does it take a Dexcom G7 to be accurate?
Accuracy improves over the first 2–12 hours after sensor insertion. The first 24 hours are considered a startup period with gradually improving reliability.
Where is the Dexcom G7 most accurate?
Approved sites like the back of the upper arm (ages 2+) provide the most reliable readings due to consistent tissue and minimal compression.
Why does my Dexcom G7 just say high?
The “HIGH” alert appears when glucose exceeds the sensor’s measurable range, often above 400 mg/dL. Confirm with a finger-stick and take corrective action.
Why do Dexcom G7 sensors fail so often?
CGM sensor usually fail due to incorrect application, due to unusual pressure applied, and due to being exposed to extreme temperatures, i.e., lower than 36°F or higher than 86°F.
Where is the best place to put a Dexcom G7 sensor?
According to the company, applying G7 on the back of upper arm shows the most accurate results. Although in kids between 2 – 6 years of age, it can be inserted on upper buttocks.
Disclaimer: This is only for informational purposes and should not substitute your healthcare specialist’s advice.


I was taken to ER yesterday because of frequent hypoglycemia. Upon arrival in the ER, my Dexcom G7 showed a reading of 82. They tested my reading through One Touch and my reading was 250. Whoa, I was treating the wrong symptoms. I had some blood tests done and my blood sugar still showed 250. I changed my sensor as soon as I got home. Before lunch today, CGM showed 72. One Touch showed 61. I tried to call customer support but the wait was too long. Please comment. Thanks.
Hello Josephine. We feel sorry to hear about your experience. That is an unacceptable difference and should be reported to the Dexcom, to bypass the call queue, you can fill out this support request form. For future reference, if your symptoms do not match your glucose readings, you are advised to use a fingerstick test.
Just to add here, compression lows may be experienced in CGM. This is a situation when a considerable high pressure is applied on your CGM sensor, and to avoid it, many side sleepers do not wear it on the side they sleep.
Moreover, a loose sensor may also give low readings and to minimize this issue overlay patches are used. CGM Patches cover an extensive range of Freestyle and Dexcom sensors.
Hope this helps!