Table of content
- Introduction
- Understanding the Dexcom G6 and Its Calibration
- When Should You Calibrate Your Dexcom G6?
- How to Calibrate Dexcom G6: Step-by-Step Calliberation
- Best Practices for Effective Calibration
- Common Dexcom G6 Calibration Issues with Troubleshooting
- Dexcom G6 vs. Dexcom G7: Calibration Differences
- How to Maintain CGM Accuracy Without Manual Calibration
- Conclusion:
- People Ask For
Introduction
Precisely and dependably, accurate medical devices assist in diabetes management. Care as well as precision are presented by one of the best tools available, the Dexcom G6 Continuous Glucose Monitor (CGM). It provides monitoring every five minutes and, due to its ease of use, only a few finger pricks are required. Even though the G6 is designed for ease of use, there are examples when the readings seem incorrect. Calibration of the device can help improve accuracy so that you have the right information to make decisions regarding your health.
In this article, we aim to answer the questions ‘when’ and ‘why’ calibration is needed, explain how to calibrate your Dexcom G6 with a step-by-step guide in tabular form, outline the dos and don’ts to minimise errors, and incorporate evidence-based recommendations to strengthen clinical guidelines.
Understanding the Dexcom G6 and Its Calibration
The Dexcom G6 is an advanced CGM that tracks your glucose levels continuously, delivering updates every five minutes. Because of its factory-calibrated system, it is good for most users without the need for manual adjustment.
However, some scenarios exist where manually calibrating your Dexcom G6 can help enhance its accuracy. This involves inputting a blood sugar value obtained from a fingerstick into the app so that the CGM can better approximate your glucose levels. While the system is usually accurate without doing this, manual calibration can be helpful if the sensor isn’t working quite right for your body or if the readings seem off.
When Should You Calibrate Your Dexcom G6?
Calibration is not typically needed, but it may be helpful in the following scenarios:
- Your CGM readings don’t align with how you feel or your fingerstick results.
- There’s a consistent difference between CGM and blood glucose meter readings (e.g., CGM shows 165 mg/dL, but fingerstick shows 125 mg/dL multiple times).
- You encounter sensor errors or gaps in data.
- Your healthcare provider advises calibration to improve accuracy.
Take, for instance, if there is a consistent discrepancy between your CGM and fingerstick measurements. This discrepancy can sometimes be resolved through calibration. Research shows that calibration is best done during periods of stability, as rapid fluctuations in glucose levels tend to create errors.
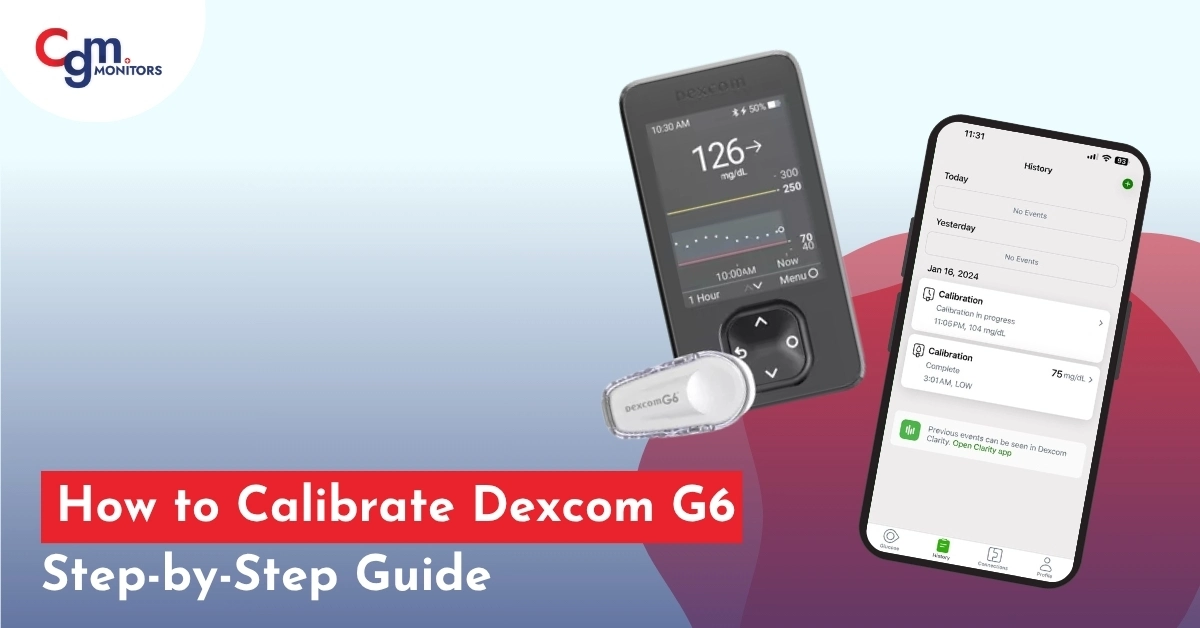
How to Calibrate Dexcom G6: Step-by-Step Calliberation
Calibrating a Dexcom G6 requires a series of steps using the app or the receiver itself. Make sure to maintain a steady glucose level to yield the best results.
| Step | Action | Details |
| Prepare for Accuracy | Wash hands and perform a fingerstick test | Clean your hands with soap and water (avoid alcohol wipes to prevent residue affecting results). Use a trusted, FDA-approved blood glucose meter. |
| Open the System | Start the app or receiver | Open the Dexcom G6 app on your smartphone or use the receiver device. |
| Find Calibration Settings | Go to Settings and choose Calibration | Locate the Calibration option in the Settings menu. |
| Enter Your Reading | Type in the fingerstick result | Input the exact glucose value from your blood glucose meter. |
| Save the Entry | Press Save | Confirm by selecting Save to complete the process. |
Best Practices for Effective Calibration
To ensure your calibration is accurate, follow these guidelines:
- Use an FDA-approved blood glucose meter known for reliability.
- Avoid calibrating during rapid glucose changes, such as after meals or physical activity, as this can lead to errors.
- Wait at least 2–3 hours after inserting a new sensor to allow it to stabilize.
- Do not calibrate immediately after eating, insulin doses, or exercise.
These practices align with clinical recommendations to optimise CGM accuracy. For instance, research highlights that calibrating during stable glucose periods reduces the risk of over-correction, which can skew readings
Common Dexcom G6 Calibration Issues with Troubleshooting
If you face challenges during calibration, here are solutions to common problems:
- Error Messages: Double-check the glucose value entered and ensure your sensor is not expired or damaged.
- Calibration Rejected: Wait 15–30 minutes and try again. If the issue persists, restart the app or receiver.
- Persistent Inaccuracies: Clean your fingers with soap and water (not alcohol, which can leave residue) and use a fresh test strip.
If problems continue, contact Dexcom’s customer support (Dexcom Support) or consult your healthcare provider. Studies suggest that proper sensor maintenance and calibration timing are critical for consistent CGM performance.
Dexcom G6 vs. Dexcom G7: Calibration Differences
The Dexcom G6 allows manual calibration, while the newer Dexcom G7 has a more refined sensor that often doesn’t require user calibration. If you’re curious about an upgrade, here’s how they compare:
| Feature | Dexcom G6 | Dexcom G7 |
| Calibration | Optional when needed | Fully factory-calibrated |
| Sensor Warm-Up | 2 hours | 30 minutes |
| Wear Time | 10 days | up to 10 days |
| Size | Slightly larger | Smaller, more compact |
According to experts, the Dexcom G7’s improved sensor accuracy reduces the burden of user calibration, making it more convenient for people new to CGM use.
According to the December Update: The Dexcom has launced its new Dexcom G7 sensor who offer you 15 days with a 12 hours extra weartime that is available on CGM Monitors at very affordable price.
How to Maintain CGM Accuracy Without Manual Calibration
You can still improve your CGM accuracy without needing frequent calibrations:
- One should stay hydrated in order to avoid dehydration, which would lead to a glucose shift.
- A clean and dry sensor insertion site is vital.
- No movement or pressure areas for sensor placement.
- Do not calibrate during hypoglycemia or after intense exercise.
For added consistency, consider using real-time alerts and a smart insulin pen that can connect with Dexcom G6.
Conclusion:
Designed to mitigate the difficulties involved in diabetes care, the G6 Dexcom has brought great relief. Knowing how to calibrate a device, though, can be very helpful when certain information needs some precision. Working with the suggested recommendations and best techniques will guarantee that your CGM is as useful as possible, while your diabetes care is devoid of concerns.
Note: Consult your healthcare provider for guidance tailored to your unique needs regarding diabetes management (Dexcom User Guide).
People Ask For
How do I enter a calibration into the Dexcom G6 app?
In the Dexcom G6 app, tap Settings, select Calibrate, and input your recent fingerstick blood glucose value from a meter. Ensure it’s accurate and entered promptly after testing. Save the entry to apply the adjustment. Calibration is optional and only needed if sensor readings seem off compared to your meter or symptoms.
How accurate does my fingerstick need to be for a Dexcom G6 calibration?
Your fingerstick must be highly accurate. Use non-expired strips, wash and dry hands thoroughly, and use a fresh lancet. Values should be 40–400 mg/dL and measured when glucose is stable to ensure proper calibration and optimal sensor performance.
Who can benefit from understanding Dexcom G6 calibration?
Anyone using the Dexcom G6 for diabetes management—including type 1 and type 2 patients, caregivers, and healthcare providers—can benefit from understanding calibration to troubleshoot inaccuracies and optimize glucose control.
When should I avoid calibrating my Dexcom G6?
Avoid calibrating during the first 24 hours of a new sensor, when glucose is rapidly changing (up/down arrows), under sensor pressure, or during error messages. Also skip calibration after eating, exercising, insulin dosing, or light exposure, which can affect sensor stability.
How do I manually calibrate my Dexcom G6 sensor?
Perform a fingerstick test with a reliable meter, ensuring hands are clean and dry. Open the Dexcom G6 app or receiver, go to Settings > Calibrate, and enter the exact meter value within 5 minutes for optimal alignment. This optional step fine-tunes readings if they differ from your meter by more than 20%.
When should I calibrate my Dexcom G6 for best accuracy?
Calibrate when glucose is stable (horizontal arrow), ideally after the first 24 hours of sensor use, and only if the sensor differs from your meter by more than 20% (20/20 rule). Perform it during steady states, like before meals or when symptoms align with the meter.
Why would my Dexcom G6 need calibration if it's factory-calibrated?
Even though the Dexcom G6 is factory-calibrated, optional calibration may be needed if readings differ 20–30% from meter values due to individual body variations or environmental factors, helping personalize accuracy without overriding built-in settings.
What happens if I calibrate my Dexcom G6 incorrectly?
Incorrect calibration—such as during rapid glucose changes or using inaccurate fingersticks—can cause exaggerated fluctuations, trigger recalibration alerts, or lead to sensor errors. A “Calibration Not Used” message may appear, requiring a correct repeat.
What blood glucose meter should I use for Dexcom G6 calibration?
Use any FDA-cleared meter that provides accurate fingerstick readings. Avoid alternative-site testing or other devices. Popular options include Contour Next and Accu-Chek. Ensure the meter is maintained and supplies are fresh for reliability.
What is the purpose of calibrating a Dexcom G6?
Calibration is used to optionally adjust sensor readings when they deviate 20–30% from fingerstick meter values, helping align the CGM with your meter for more accurate decision-making.
Compare the top 5 solutions for How to Calibrate Your Dexcom G6
1. Wait for Stability: Calibrate only when blood glucose is stable (horizontal arrow).
2. Accurate Fingerstick Technique: Use clean, dry hands and fresh supplies to minimize errors.
3. Skip First 24 Hours: Allow factory settings to settle before calibrating.
4. Respect Error Ranges: Calibrate only if differences exceed the 20/20 threshold.
5. Avoid Post-Activity Timing: Don’t calibrate immediately after meals, insulin, or exercise for smoother sensor performance.


Write a comment
Your email address will not be published. All fields are required