Table of content
Introduction
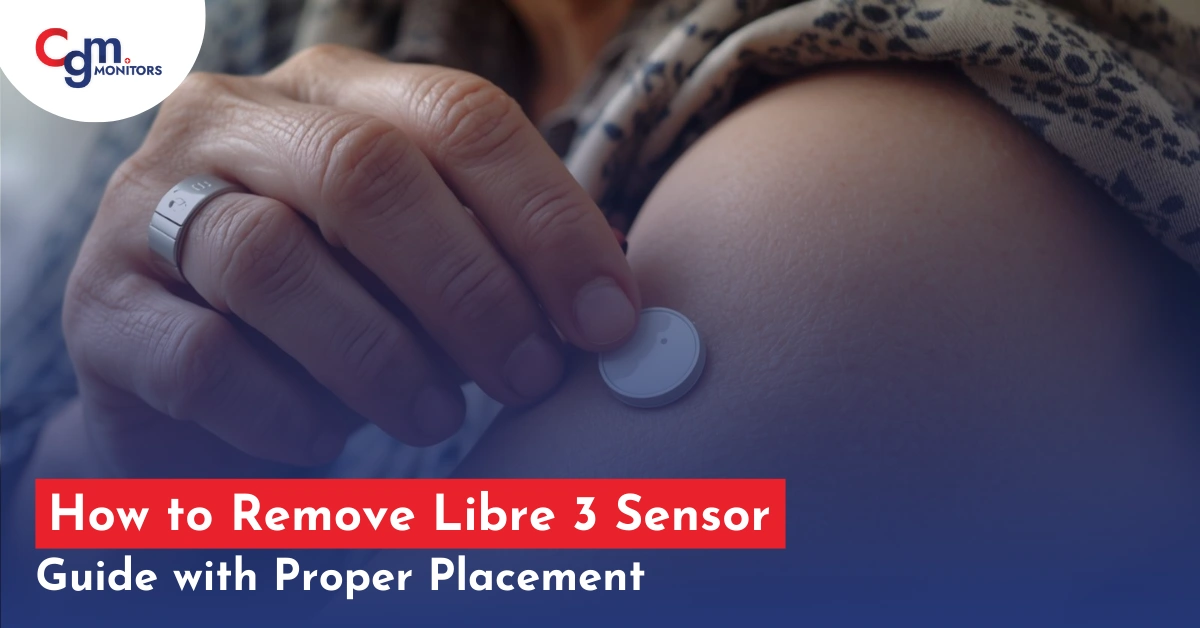
Removing your Freestyle Libre 3 Sensor is a simple process, but doing it carefully ensures your skin stays healthy. Whether it’s time to replace the sensor or you need to remove it early, proper steps help prevent irritation. With the right technique and a little patience, you can safely take off the sensor without discomfort. Follow this step-by-step guide to make sensor removal easy and hassle-free. Moreover, if you are new to Libre 3 sensor applications and do not know how to apply this sensor, this blog will also help you in this regard with proper instructions with caring.
How to Remove FreeStyle Libre 3 Sensor in 7 Easy Steps
Step 1: Wash Your Hands
Before touching the sensor, wash your hands properly with soap and water. This reduces the risk of infection (Bacterial or viral) and keeps the site clean.
Step 2: Prepare Materials
You’ll need:
- Adhesive remover (optional, like medical tape remover)
- Rubbing alcohol or antiseptic wipes (the best option)
- A clean cotton ball or gauze for extra precautions
- Bandage (if required)
Step 3: Clean the Area
Gently clean the skin around the sensor with an alcohol wipe to reduce bacteria and viral infection. Let it air dry for a few seconds.
Step 4: Loosen the Adhesive
If the sensor is firmly attached with CGM patches, use your fingers or a medical adhesive remover to lift the edges gently. Pull slowly with the help of your index finger and thumb to avoid skin irritation.
Step 5: Remove the Sensor
- Hold your Libre 3 sensor close to the skin.
- Slowly peel it off from one side to the other.
- Apply gentle pressure on the skin nearby to minimize discomfort.
Tip: Pulling straight off quickly can sometimes hurt more than slow, steady removal.
Step 6: Clean the Skin Again
After removing the Libre 3 sensor, wipe the area with rubbing alcohol or a mild antiseptic to remove any leftover adhesive.
Step 7: Apply a Bandage (Optional)
If your skin is sensitive or slightly irritated, cover the area with a small bandage for a few hours.
Extra Tips
- Avoid using sharp objects like a knife or scissors to remove the sensor.
- If the adhesive residue is deeply embedded, use baby oil or an adhesive remover pad for moisturizing.
- Remove the sensor at the end of its 14-day period for maximum accuracy.
What to Do After Removal of Libre 3
- Clean and Soothe – Wash the placement site with mild soap and water. For sensitive skin, apply a fragrance-free lotion or aloe vera to calm irritation.
- Avoid Sharp Objects – Gently peel the sensor off with your fingers; do not use scissors or knives.
- Rotate Sites – Place your next sensor on a different spot on the back of your upper arm to let your skin heal and ensure accuracy.
- Remove Adhesive Safely – Use a medical adhesive remover wipe if sticky residue remains.
- Check Skin Health – Look for redness or irritation; consult your doctor if it worsens before applying a new sensor.
- Dispose Properly– Follow package instructions; use a sharps or medical waste container for used sensors and applicators.
- Store Next Sensor Properly – Keep it in its original packaging at room temperature until use.
Quick Action in Short Steps
- Pull off the adhesive edge.
- Slowly peel it away, all in one motion.
- Dispose of this old sensor and applicator as per the guide on your package.
Now, to insert a new sensor, find a site, possibly on the other arm – it’s suggested to rotate sites.
Still using the old finger-prick method?
Get a free benefit check from CGM Monitors and claim your CGM device today.
Steps to Applying the Libre 3 Sensor
- Wash the application site with non-fragrant soap like Hibiclens Antiseptic Skin Cleanser or water.
- Dry with a clean towel. Then clean with an alcohol wipe. Let the space dry.
- The Freestyle Libre 3 sensor and applicator come assembled, so you don’t need to attach them. Only unscrew the cap and put it aside.
- Do NOT put the cap back on, as it may harm the sensor.
- Place this applicator (which has the sensor inside it) over this prepared site on the back of your upper arm.
- Push down firmly – sensor applied.
Starting the Libre 3 Sensor
NFC is required to scan the sensor. The iPhone 7 and later models have built-in NFC support, whereas NFC support varies across Android phones. Android users need to check and turn on NFC. From the app’s menu or the app’s home screen, TAP ‘scan new sensor’.
Libre 3 Scanning Method
For iPhone (iOS):
- Open the Libre 3 app.
- Hold the top of your iPhone near the sensor.
- Wait for the phone to detect and complete the scan.
For Android:
- Open the Libre 3 app.
- Hold the back of your Android phone against the sensor.
- Keep it steady until the scan is successful.
Tip: Move your phone a bit if it is not detecting the sensor.
Conclusion:
Removing a Freestyle Libre 3 sensor is easy; you need to pull off the adhesive and slowly peel the sensor off in one direction. However, if you experience any difficulty, you can apply an adhesive remover, baby lotion, or coconut oil around the edges of the CGM sensor. Once the adhesive begins to loosen, gently peel off the sensor, taking care not to irritate the skin.
Disclaimer: This blog is for informational purposes and is written expertly. Cgm Monitors’ experts always consult a healthcare specialist before taking any medical action.


I put the cap back on the Libre 3 and can’t get the sensor to release from top of cap. What can I do?
Hello David. Thanks for reaching out!
To apply your FreeStyle Libre 3 sensor:
Hold the back of the applicator (the smooth part with a Freestyle logo).
Twist and remove the sensor cap — it’s the part with the vertical grip lines.
Place the applicator firmly against your cleaned application site (usually the back of the upper arm).
Press down firmly until you hear a click. That means the sensor is properly inserted.
Need a visual guide? Watch this short clip from 1:27 to 1:52:
https://youtu.be/ePnLXUcdBfc?si=GGtM5vf-cj1x_86b
Let us know if you need help with sensor removal or pairing too!