
Table of content
How to use Contour Next Gen Glucose Meter? A common question with simple answers, too. This glucose monitor involves careful monitoring of blood glucose levels, and having the right tools can make all the difference. This glucose meter is designed to simplify this process with advanced features and user-friendly technology. Whether you’re new to glucose meters or just switching to the Contour Next Gen, this guide will walk you through the essentials of using it effectively. Before using it properly, you need to understand what it actually is and how it works. Let’s find out.
What is the Contour Next Gen Glucose Meter?
The Contour Next Gen Glucose Meter is an advanced blood glucose monitoring system designed with accuracy and simplicity. To facilitate understanding of results, its SmartLight feature shows with color-coded lights glucose levels that are on target, high, or low. With Second-Chance Sampling, you can add more blood within 60 seconds, saving strips and hassle. It integrates perfectly with the CONTOUR® DIABETES app, which is free and can be downloadable from the Google Play Store. The app tracks user trends, provides tailored feedback, and enables report sharing with doctors. Also, users of all ages can benefit from its large display and rubber button features.
How to use Contour Next Gen, is a state-of-the-art glucose meter designed to provide accurate blood sugar readings. It boasts a range of features including:
- No Coding Required: Eliminates the need for manual calibration.
- High Accuracy: Uses advanced technology for precise results.
- Smart Features: Includes options for tracking and managing your data.
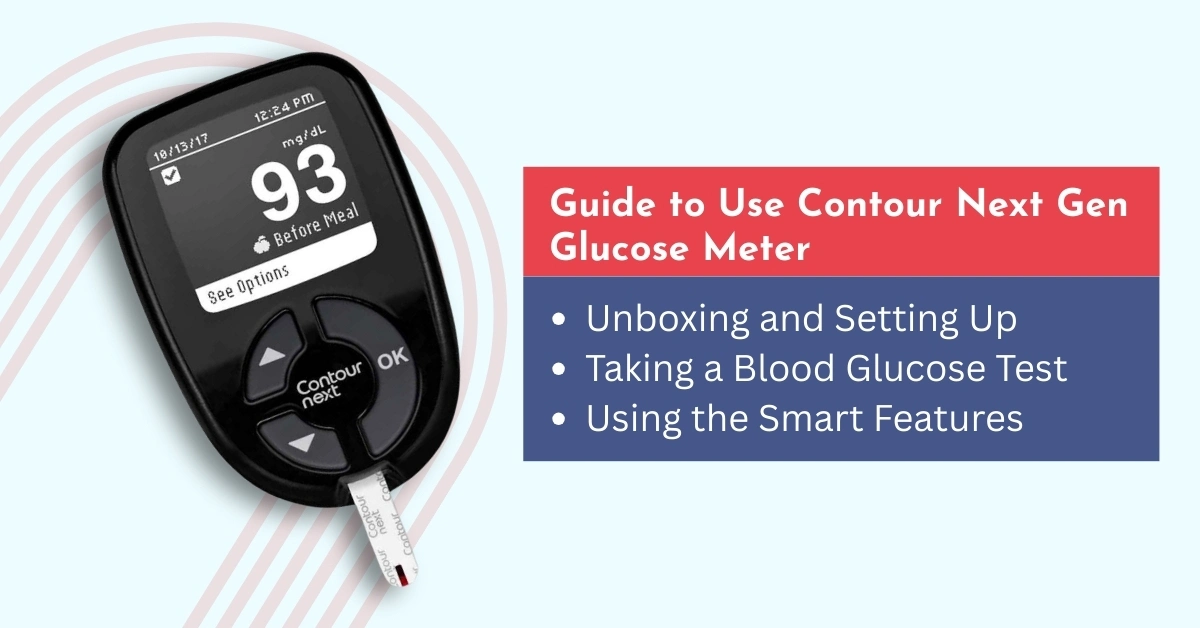
Guide to Use Contour Next Gen Glucose Meter
1. Unboxing and Setting Up
To get started with your CONTOUR glucose meter, follow this guide.
- Unpack the Meter: Inside the box, you should find the glucose meter, a lancing device, test strips, a control solution, and a user manual. Make sure that all components are included and in good condition.
- Insert the Batteries: Most meters come with batteries included. Open the battery compartment, insert the batteries as indicated, and close the compartment.
- Set the Date and Time: Follow the instructions in the manual to set the correct date and time on your meter. Accurate time settings help track your blood glucose levels more effectively.
- Prepare the Launching Device: Insert a new lancet into the lancing device, twist off the protective cover, and set the desired depth for your skin type.
2. Taking a Blood Glucose Test
- Wash your Hands: Always start by washing your hands with soap and water. Dry them thoroughly to avoid any contamination or inaccurate readings.
- Prepare the Test Strip: Insert a Contour Next Gen test strip into the meter. The meter should automatically turn on.
- Prick the Finger: Use the lancing device to gently prick the side of your fingertip. The device will create a small, precise puncture.
- Apply Blood to the Test Strip: Gently squeeze your finger to produce a small drop of blood. Touch the drop of blood to the test strip. The meter will beep or signal when it has received enough blood.
- Wait for the Result: The meter will display your blood glucose level within a few seconds. Record the reading and any relevant notes.
Helpful Tips for Accurate Testing
- Store Test Strips Properly: Always keep test strips in their original bottle and seal the cap tightly right after taking one out to maintain their quality.
- Protect Your Meter and Strips: Keep your meter and test strips away from extreme humidity, heat, cold, dust, or dirt to ensure reliable results.
- Avoid Xylose Testing Interference: Don’t use the meter during or soon after a xylose absorption test, as it may affect accuracy.
3. Using the Smart Features
- Log Your Result: The Contour Next Gen meter allows you to log your results directly into the device. This can be useful for tracking patterns over time.
- Review Patterns: Use the meter’s built-in memory to review your blood glucose patterns. This feature can help you and your healthcare provider make informed decisions about your diabetes management.
- Set Alarms: If your meter supports it, set alarms to remind you to test your blood glucose at specific times. This can help you stay consistent with your testing routine.
- Connect to an App: Many modern glucose meters can connect to smartphone apps. Check if the Contour Next Gen is compatible with such apps, as they can provide additional features like detailed graphs and trend analysis.
Maintenance and Troubleshooting in Contour Gen
- Replace Test Strips Regularly: Test strips have an expiration date and should be replaced regularly. Store them in their original container to avoid exposure to moisture and heat.
- Clean Your Meter: Wipe the meter with a dry cloth to keep it clean. Avoid using water or cleaning solutions directly on the device.
- Check Battery Levels: Replace the batteries as needed to ensure your meter continues to function properly.
- Troubleshoot Issues: If you encounter problems, refer to the user manual for troubleshooting tips. Common issues might include error messages or incorrect readings.
Conclusion
The Contour Next Gen glucose meter is a powerful tool for managing diabetes, offering ease of use, accuracy, and advanced features. By following these steps and utilizing the meter’s smart functionalities, you can effectively monitor your blood glucose levels by buying Contour Next Gen from our website at CGM Monitors and take control of your diabetes management.
Always remember to consult with your healthcare provider to tailor your glucose monitoring to your specific needs. Happy testing!
Frequently Asked Questions
How to use Contour blood glucose monitor with app?
The Contour Next Gen glucose meter pairs easily with the free Contour Diabetes app. Just turn on Bluetooth on your smartphone phone, open the app, and follow the pairing instructions as given on Cgm Monitors. Once connected, every test result from your meter will automatically sync to the app. This lets you track trends, see averages, and even share your results with your doctor without manual logging.
How does the Contour Plus glucometer work?
It works by reading the electrical signal produced when your blood interacts with the chemicals in the test strip. This reaction helps the device measure glucose concentration quickly and accurately. The Contour Plus and Contour Next Gen use advanced technology to compensate for common testing errors, like slightly underfilling the strip.
How do you use a glucose monitor step by step?
Here’s the quick routine:
- Wash your hands.
- Insert a test strip into the meter.
- Use the lancing device to prick your finger.
- Touch the blood drop to the strip.
- Wait for the meter to display your result.
- Record or sync your reading (if using an app).
Do you wipe the first drop of blood for glucose?
Cgm Monitors’ experts recommend wiping away the first drop with a clean tissue or cotton, as it may contain fluid from your skin that could slightly alter the reading. The second drop is usually cleaner and provides a more accurate glucose measurement.
Does Contour Next Gen need to be calibrated?
No, the Contour Next Gen meter comes pre-calibrated. Unlike older devices, you don’t need to enter a code or perform manual calibration when using Contour Next test strips — just insert the strip and test. This makes the process faster and more user-friendly. If you purchase a new one and shows calibration errors you can request the for replacement.
How accurate is the Contour Next Gen blood glucose meter?
The Contour Next Gen is designed to meet ISO (International Organization for Standardization) accuracy standards, meaning the results are within a very small margin of error compared to lab testing. Many users find it consistently reliable, which is why it’s trusted by both patients and healthcare providers.
What is the normal range for Contour Next Gen?
While the meter can display any number your blood glucose measures, “normal” ranges are generally the same for all devices:
- Before meals: 80–130 mg/dL
- 2 hours after meals: Less than 180 mg/dL
What does the green light mean on Contour Next Gen?
The green light is part of the smartLIGHT® feature. A green light means your reading is within your target range. Amber means above target, and red means below target. This quick color cue helps you instantly understand your result without needing to analyze the numbers.


Write a comment
Your email address will not be published. All fields are required